Aws s3 and cloudfront
Introduction
What’s static website or web contents? static website is a collection of web page of static html and style. We can use s3 to host to simple website like that.

Prerequisites
Below is some requirement for hosting static web in s3 bucket
- Static website
- DNS configure with Cloudflare
- Install Aws cli for copy your static website to s3 bucket
- Create iAM user for copy your website source code to s3
- SSL Certificate
How to ….
As you can see the image above the introduction. First user will access to dns and then dns will map to cloudfront then It will point to s3 bucket which contain your web static.
Below is brief step to follow:
- Create IAM user and create iam profile in your local
- Create s3 bucket and apply policy and cors rule
- Enable s3 static website hosting
- Upload your website to s3 bucket
- Create cloudfront distribution map to your s3 bucket
- Create cloudfront error response page
- Point dns from cloudflare to cloudfront
Please follow the tutorial step below
Follow the step below
1. Create IAM user and create IAM profile in your local
Login to aws console => IAM => User => Create User

Then you enter user info

Next Permission
Add permission “AmazonS3FullAccess”

Next tag => Next => Review => Create User

Then It will give the password to login aws console
After login go to user and view your user information the find the tag “Security credentials” then create “Access Key”

After create it will alert you the “access key “ and “secret key”. I assume that you have install aws cli already.
Follow this link : https://docs.aws.amazon.com/cli/latest/userguide/getting-started-install.html
Then you need to configure profile in your computer
Type the command to configure
aws configure
Enter access key, secret key and region then done. When you done you can change your profile if you have many profile later to config. by default it take [default]. If you want to rename it just type the command to edit profile and edit.
vim ~/.aws/credentials
2. Create s3 bucket and apply policy and CORS rule
go to s3 bucket => Create Bucket

**Note: if you allow public access it is danger because you have allow all your content access from outside.
Enter bucket name then allow all public access (Unchecked block all public access)
Then click “create bucket” after create already
Go to view your s3 bucket the click tab “Permission”

Edit bucket policy
{
“Version”: “2012–10–17”,
“Statement”: [
{
“Sid”: “PublicReadGetObject”,
“Effect”: “Allow”,
“Principal”: “*”,
“Action”: “s3:GetObject”,
“Resource”: “arn:aws:s3:::static-websitedemo/*”
}
]
}
Then scroll to below and edit CORS
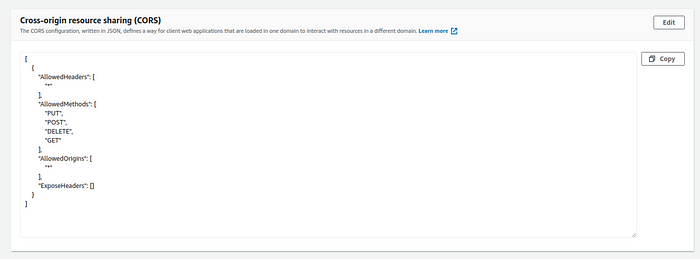
[
{
“AllowedHeaders”: [
“*”
],
“AllowedMethods”: [
“PUT”,
“POST”,
“DELETE”,
“GET”
],
“AllowedOrigins”: [
“*”
],
“ExposeHeaders”: []
}
]
3. Enable s3 static website hosting
Go to tab “Properties” of your s3 bucket => scroll to bottom, edit and enable “static web hosting “

After edit you will see this

Select “Enable “ => input “index.html” => “Save change”
After save you will get the url of your website as below

but this URL isn’t working yet because you haven’t upload your code to s3
4. Upload your website to s3 bucket
Upload your code to s3 bucket by this command below
aws s3 cp {web_folder}/ s3://static-websitedemo — recursive — profile demo
Ex: aws s3 cp web/ s3://static-websitedemo — recursive — profile demo
Open terminal and go to your website directory, web is the project folder
➜ Desktop ls -la
total 16
drwxr-xr-x 4 kimly kimly 4096 ១ 24 14:30 .
drwxr-xr-x 34 kimly kimly 4096 ១ 24 14:30 ..
drwxrwxr-x 3 kimly kimly 4096 ១ 13 08:14 test
drwxrwxr-x 3 kimly kimly 4096 ១ 20 13:53 web
Type command
➜ Desktop aws s3 cp web/ s3://static-websitedemo — recursive — profile demo
After copy already you can visit the website
URL: http://static-websitedemo.s3-website-ap-southeast-1.amazonaws.com/

But it is not on that because the url is secure only http and that url cannot map with domain name so, you need to create cloudfront to map with your s3 bucket.
5. Create cloudfront distribution map to your s3 bucket
go to aws console => cloudfront => create distribution

you will see this form

Select you s3 bucket to map, then scroll to bottom update in setting


Then click “Create distribution”

After deploying is done you can visit the Cloudfront URL with ssl certificate. You also can map that URL with cname recode in dns management. It this context I use cloudflare for manage dns.

6. Create Cloudfront error response page
This point is really important because while you have deploy already, your static web page cannot reload by url, you will the permission denied page because S3 doesn’t understand route so, you need to create error response page to fix this issue.

Create new error response page

“Save changes” => done
7. Point dns from cloudflare to cloudfront
Create cname record and use dns only

After map you can access in your domain name
URL: https://test-demo.domain.com
Static website: https://github.com/kimlyvith/static-website.git
Now it work. Cheers !!! …. :)
#sharingculture#startfromyou#cambodia#devops#hosting-satic-website#s3bucket#cloudfront#cloudflare#sharingiscaring